This week I had a few days off work and time to myself. I also had a few extra nail polishes that I’d borrowed/ claimed from other family members, and I was inspired to try out some fancy nail art after meeting Jessie from Nailed It NZ earlier in the year. Check out her stuff here!
I decided to try out this particular logo on one nail:
There is a long story behind that logo, but that’s for another time 🙂
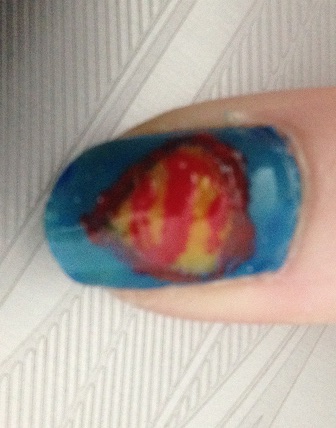
Now let me say that I have no experience with nail art prior to this attempt at Superman’s logo.
The most I have done is French tips (but not well), and black with gold glitter over the top (which only requires patience for the polish to dry).
I had my blue nail polish and I just gave it a go. I did a base coat before painting my left thumbnail blue. But when I went to actually draw the diamond which encloses the ‘S’, I stumbled.
I didn’t have any nail tools. How was I meant to draw something with a normal brush? Impossible.
So I did what any modern day person would do when faced with the unknown… I googled it. And that led me to YouTube, where people were using all sorts of fancy tools to create wonderful art. This at least gave me the idea of how to draw on my nail, but I still didn’t have the answer to “what with?”
So I improvised.
First of all I tried a hair clip. It worked! It look a while as the polish tried to dry on the hairclip, when I was trying to transfer it to the nail, but I still got there.
However when it came to using the yellow over the top of either blue or red, here was a major fail. The yellow was useless. You could hardly see it. Even the red looked bad over blue. So instead, I scratched off the area I needed and re-painted it with the base coat. THEN I layered the yellow and red.
And I’m pretty happy with the way it turned out.
But here’s the thing. I’m a massive geek. Especially when it comes to superheroes.
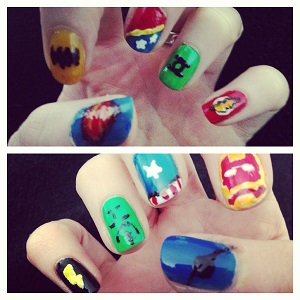
So I had a new idea… to have one hand filled with the Justice League (DC), and the other with the Avengers (Marvel).
I drew up a rough idea of what I wanted to paint, thanks to other nail images I found online. Here are my sketches:
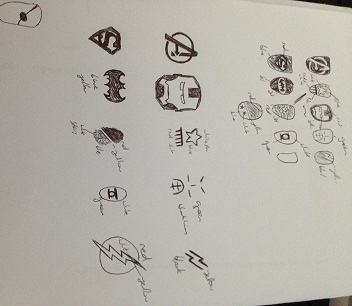
The drawn plan wasn’t just so I knew what image I was doing. It was also to plan out which hero was on which nail. Firstly DC for the left hand, Marvel for the right. Then I tried to match the colours as best as possible: index is yellow, middle has blue, next is green, and finally the pinkys’ would have bolts (so not matching colours but matching images). This is also true for the middle finger. Both with stars, both with similar designs.
I painted the base colours on all of them first. When it came to adding the next layer, this is where I found some issues. Again the yellow wasn’t strong enough on its own, so I used a white pen that I had for French tips and used that underneath any yellow that was required. The pen also came in handy for stars and under Flash’s bolt.
An old earring (missing its partner) did most of the details, like lines and bolts. I regretted using the hairclip for Batman’s logo, as I think the earring would have made it a lot better, but here is the final result for all of the designs.
As a first timer, I think it’s pretty cool.
It was both easier and harder than I imagined and I would encourage everyone to give it a go. It doesn’t have to be superheroes! It’s amazing what can fit on a tiny nail, and it was a pretty cool project for a few slow days.

Leave a comment